Change the size of desktop icons in Windows 7 + create custom icon dimensions
By default, Windows 7 displays medium icons on the desktop. But you can easily change the size of desktop icons with a couple of clicks; using small icons allows you to see more files on the desktop, while large icons are easier to see, and nicer looking in some cases. This tutorial explains how to change the dimensions to one of three settings: Small icons, Medium icons, or Large icons. We will also show you a trick that allows you to resize and use custom icons sizes on your desktop.
- In this Windows 7 tutorial:
- Make your desktop icons smaller or larger
- Use a custom icon size on your desktop
- Restore / reset the default icon size
Make your desktop icons smaller or larger (from default size of Medium)
Follow these simple steps to change the size of desktop icons in Windows 7:
- Right-click on an empty area of the desktop (between icons)
- From the context menu, choose "View"
- Under the View submenu, you see three icons size options: by default, "Medium icons" is selected. Click on "Large icons" to make your desktop icons larger or on "Small icons" to make them smaller.
- As soon as you choose a different icon size, Windows 7 applies the change, and places a mark next to the icon dimension you are currently using.
To give you an idea of each of the standard icon sizes, look at the screenshot below: you are seeing the same icon on the desktop in its small, medium, and large version: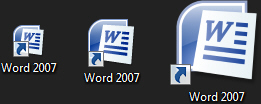
Use a custom icon size on your desktop
But Windows 7 lets you customize the desktop icons size even further, using minuscule icons to huge icons. Here is how you can create your own custom icon sizes:
- Minimize all your windows (keyboard shortcut of Windows+M or click on the Aero Peek button)
- Hold down the control key on your keyboard ("Ctrl") - remember to keep it pressed down while your resize your desktop icons: as soon as you release, the resizing effect stops.
- Now, use the wheel on your mouse: scroll up to make the icons larger, or scroll down to make the icons smaller - Windows 7 applies the change in real time, and shows resized icons on-the-fly.
- After a point, you will no longer see your desktop icons grow or shrink: this tells you that you have reached the largest icon size (or smallest icon size, as the case may be).
![]() While very few Windows 7 users are likely to use the largest icon size, it is nice to have this feature available as an option - and using the smallest icon size (screenshot on the left) can be useful if you have lots of files and folders on your desktop!
While very few Windows 7 users are likely to use the largest icon size, it is nice to have this feature available as an option - and using the smallest icon size (screenshot on the left) can be useful if you have lots of files and folders on your desktop!
Restore / reset the default icon size for your desktop
Follow these few steps to reset and revert to a standard desktop icon size:
- Right-click on the desktop (between icons)
- From the context menu, choose View
- And then choose an icon size: restore to Medium to use the Windows 7 default settings
This is all it takes to change the desktop icons' dimensions in Windows 7!
Tip: if your icons appear all of a sudden too large or too small, it is probably because you or another user has accidentally "Ctrl+scrolled" to a custom icon size.
up ↑