Set or change your default printer in Windows 7
The "default printer" is no different than any other printers or print drivers you have installed on your Windows 7 computer; the only attribute that distinguishes default printers from others is the fact that it is automatically selected whenever you invoke the "Print" dialog (the small window that opens when you click on a printing command in menus or toolbars, or press the Ctrl+P keyboard shortcut - which works in 99% of Windows applications). The first printer you install on Windows 7 automatically becomes the default printer (since it is the only one), and the only case in which you have no default printer configured is when no printers or print drivers are installed or available to your PC. This tutorial explains how to set or change your default printer in Windows 7.
Set the default printer in Windows 7
Follow these steps to choose another printer as the default:
- Click on the start button, and type "printer" in the start menu's search field.
- When Windows 7 shows the search results, click on "View devices and printers" or "Devices and printers" - both links do the same thing, and will open the Control Panel:

- Using the start menu link results saves you time, since you are already on the right screen inside the Control Panel - no need to click around or search for the right page:
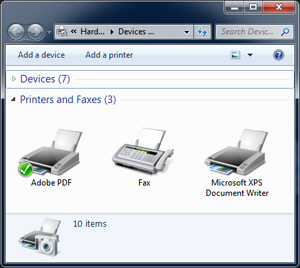
- We have hidden the regular computer peripherals in the screenshot above, you may need to scroll down a bit in your case, until you see the section labeled "Printers and Faxes". This is where Windows 7 will list all the local printers, print drivers, and any shared printer you might have configured (remote printers on your local network or HomeGroup).
- Notice that at least one printer or print driver has a green checkmark icon displayed in overlay: this indicates which printer is currently set as the default for your computer (for your Windows profile, actually, since the default printer is a user setting - each user can have a different default printer setup, in other words). In our case, Acrobat's PDF print driver is current set as the "default printer".
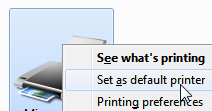
- To change the default printer, right-click on the icon of the printer or print driver in question, and choose "Set as default printer" from the context menu that opens:
- You will be able to immediately see the change, since your new default printer is now the one that displays the green checkmark above its icon:
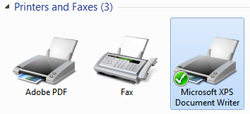
- As the above implies, the switch to another default printer takes effect immediately - no need to restart your computer or even logoff from Windows 7. The next time you try to print a document or picture from any application, you will notice that the printer / print driver you have chosen will automatically be selected in the Printers dropdown menu.
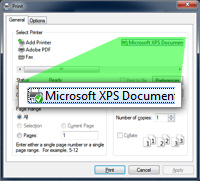
Tip: here's how to quickly test your current, default printer. Hold down the control key (Ctrl) and press "P" at the same time - The Ctrl+P keyboard shortcut will bring up the Print dialog. Notice that the correct printer has been automatically selected by Windows 7: