Customize speakers settings in Windows Vista (Speaker properties)
The previous tutorial showed you how to configure the speakers under Windows Vista; this tutorial will show you how to customize the properties and settings of your speakers, including configuring the speakers icon and renaming the speakers, enabling or disabling a set of speakers, how to adjust the output volume of the speakers, and the input level of the microphone, and this tutorial will close on the advanced speaker settings Vista exposes to most speakers.
Configure speakers and customize their settings
 To access Windows Vista's Sound properties and settings and customize your speakers' properties, go to the Start Menu and click Control Panel. Then, type speaker in the Control Panel's search box (top right corner of the window).
 Windows Vista will load all the settings containing the word "speaker". In the results displayed, locate the "Sound" section and click on "Manage audio devices", right below Adjust system volume.
Vista opens the Sound properties of your system, and preselects the Playback tab listing speakers detected on your system.
If you are using Vista's Classic Start Menu, go to Start > Settings > Control Panel > Sound. This will directly open the Sound dialog, without having to go through the Control Panel.
Customize your speakers' properties
Double-click on the speakers you would like to customize, or select the speaker and click Properties. Either way, the Speakers Properties dialog (window) will open: it contains a variable number of tabs, depending on your speakers, the sound card, etc. This tutorial will cover the options and settings relevant to all speakers.
Rename your speakers or change the icon of your speakers
 The first section of the General properties tab lets you type a new name for your speakers (they are called "Speakers" by default). The new name will take effect as soon as you click the OK button.
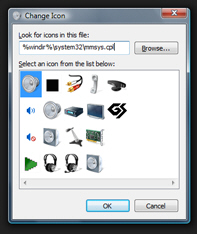
To change the icon associated with your speakers, click the Change Icon button: the Change Icon dialog appears, showing a preloaded set of icons to choose from. These icons contain both Windows Vista icons for speakers, as well as, optionally, icons that match your sound card (like the manufacturer).
If you want to pick a custom icon from another location on your computer, click the Browse button, navigate to the folder of your choice, and double-click the new icon to use for the selected speakers. Click OK to validate your choice of icon.
Choosing a custom name for your speakers, and picking a specific icons for a set of speakers comes especially handy when you have multiple speakers attached to your system. Since most people only have one pair of speakers they use all the time (Windows Vista's default speakers), the icon and name can really be anything you like, without fear of confusion.
Customize the "sound levels" of your speakers
 Click on the Levels tab of the Speakers Properties dialog, and you will see one of more "levels" of sound, the first of which represents the volume level currently set (through the volume icon in the taskbar, or through the Vista's Sound Volume Mixer itself). Depending on your computer's sound card, you may be able to adjust different volume levels, the different sound output for your right speaker and left speaker, etc.
Advanced speaker properties and settings
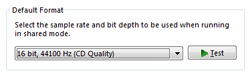 The last tab of the Speaker Properties dialog is called Advanced, and lists options and settings (properties) you may want to avoid tweaking unless you are familiar with your sound card and its configuration. Under Default Format, Windows Vista displays the sound quality level that it determined best suits your sound card and speakers. Since you can test (click the Test button) each of the settings, you can try different sample rates and bit depths one after another:
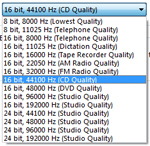
Note that, unless you have high-end speakers connected to your computer, the difference in quality between, say, the default of "CD Quality" and some of the "Studio Quality" levels will be imperceptible, at least to our human hear.
Speaker sound quality and sound problems or issues
If you later on experience sound problems after having changed sound quality on your system, click the Restore Defaults button; in most cases though, only sound quality levels supported by your sound card will be listed, therefore making unlikely any problems.
up ↑