Create a shortcut to a file or folder in Windows Vista
Shortcuts are special files that contain a reference, or pointer, to another file or folder. Windows Vista lets you create shortcuts to just about anything (you can even create shortcuts to printers!) This tutorial will show you three quick ways to create shortcuts to a file or folder: we will cover the context menu (right-click menu), a keyboard shortcut, and a mouse shortcut. We will also explain how to create multiple shortcuts at once, to multiple files, and explain the "Windows cannot create a shortcut here" error message you may have encountered in the past.
Three ways to create a shortcut
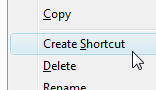 The first way to create a shortcut is to right-click on the file: from the context menu that opens, click Create Shortcut. Windows Vista will create a shortcut to the selected file, and place it in the same location as the target file (you can then cut and paste the shortcut anywhere you want). In some cases, Windows may display a question dialog, discussed below.
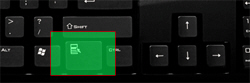 A quicker way to create a shortcut (works in Windows Vista and Windows XP) is to use a keyboard shortcut: when the file is selected, hit the Menu key (shown on screenshot), and press S (as in shortcut) when the context menu deploys.
 Yet another way to create a shortcut in Windows is to hold down one of the Alt keys on your keyboard, start dragging the file in question with you cursor, and then release.
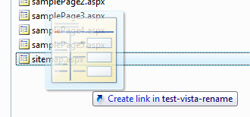
When you start dragging the file while holding down the Alt key, Windows Vista will display a ghost image of the file, and display a callout that reads "Create link in {folderName}" (where "folderName" is the name of the folder you are looking at). 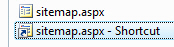 As soon as you release, a shortcut to the file is created in the same folder, and you can move it anywhere you want. To create a shortcut directly in the target folder, make sure you see the target folder in the background, alt-drag the file and drop it inside the target folder: this creates a shortcut to the original file, but directly places it in the folder where you wanted it.
Tip: Create multiple shortcuts at once
It is also very easy to create multiple shortcuts to multiple files at once, using any of the three methods outlined earlier in the tutorial: simply select all the files for which you want to create a shortcut, and then either right-click and choose Create Shortcut, use the keyboard shortcut Menu, S, or drag the files and release, all the while holding the Alt key pressed down.
"Windows cannot create a shortcut here.
Do you want the shortcut to be placed on the desktop instead?"
You may have come across this behavior in Vista and previous versions of Windows: you are trying to create a shortcut to a program, for example, and instead of creating the shortcut, Windows displays a dialog whose message reads "Windows cannot create a shortcut here. Do you want the shortcut to be placed on the desktop instead?", like this one: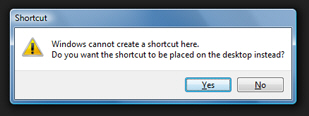
There is a reason for this behavior: by default, when you ask Windows to create a shortcut, the shortcut is created in the same location as the file to which it points. Windows Vista will show this message whenever you are trying to create a shortcut from a "protected" location, or system folder like the Program Files directory, since it does not like letting you fiddle with system files and folders.
If you click Yes, Windows will create a shortcut and place it on your desktop - from where you can cut and paste the shortcut to any location you want.
up ↑