Resize a picture in Windows 7: make an image larger or smaller
You will rarely be using a picture that is exactly the right size (of the right dimensions) for the purpose you have in mind; fortunately, Windows 7 comes with a basic image editor that allows to resize pictures up or down (make images larger or smaller). This tutorial explains how to do that, and how to prevent distortion -when a picture looks squeezed by being too wide or too tall- by leveraging the "Constrain Proportion" option. We will also show you how to resize a portion of an image, an ideal trick if you want to place emphasis on a specific area of the photo.
Resizing pictures with MS Paint
Follow these simple steps to change the dimensions of an image:
- First, open the start menu and type "paint" in the search field; then, click on the first link:

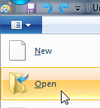
- When Paint opens, click on the top menu as shown below (or press the Ctrl+O keyboard shortcut).

- Then, navigate to the folder where you saved the picture you want to resize, and double-click on it to open it. MS Paint in Windows 7 can open the following graphic file formats:
JPEG(commonly used by digital cameras), bitmaps,GIF, TIFF (commonly used by scanners),PNG, andICOWindows icons.
Tip: once you get more familiar with Paint, a quicker to open an image file is to right-click on it, choose "Open With" from the context menu, and then click on "Paint" in the submenu.
- Once the picture is opened inside Paint, you have two options: either resize the entire image, or a portion of it. Let's start with the easiest and most common scenario.
- To resize the entire image or photo, click on the "Select" tool in the Home tab (otherwise you may inadvertently draw over the picture if a brush is currently selected).
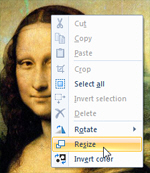
- Then, right-click anywhere inside the image, and choose "Resize" from the context menu:

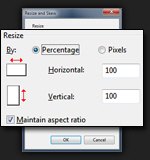
- Windows 7 will open the "Resize and Skew" dialog:

- You can now choose to resize a "Percentage" of the original picture (default), or enter an actual dimension in "Pixels", which gives you more control. The "Maintain aspect ratio" checkbox, checked by default, ensures that the image will be resized proportionately (that it will not end up looking squeezed or stretched, in other words).
- After you've entered the new dimensions you want, hit Enter (or click OK) to apply and preview the change; if it doesn't look right, you can undo the resizing operation by pressing Ctrl+Z or clicking on the "Undo" button as shown below: (or press Ctrl+Y to redo - feel free to toggle to compare)

- This is all it takes to resize a picture or make an image larger or smaller inside MS Paint on Windows 7.
Resize a portion of an image
To resize only a part of a picture, click on the Select tool in the Home tab, and drag an area around the portion of the image you want to resize. Then follow the same steps as above, and you will see resized only the area of the photo that was selected: (notice that the head is now 150% larger than originally)
The only difference is that when you want to apply new dimensions to a sub-selection of an image, you need to right-click inside the selection area to choose "Resize", otherwise Paint will deselect that area.
Note: this tutorial also works in Windows Vista and Windows XP, but you will find the Resize command under the Edit menu. (You can also press the Ctrl+E keyboard shortcut to bring up the Resize dialog for MS Paint in all three operating systems.)
up ↑