Take a screenshot in Windows 7 (Picture of the screen / capture current window)
 Whether you are trying to get help or tech support, or are writing some documentation for employees, co-workers or friends, you will sooner or later need to know how to take a screenshot in Windows 7; Windows 7 ships with all the tools you need to take all three kind of screenshots: full screen screenshot, current window screenshot, and a picture of just a portion of your screen. In other words, you don't need to download or purchase any kind of screen capture software, and this tutorial explains what free tools to use on your computer. While this tutorial is written for and with Windows 7, it also applies to Windows XP and Windows Vista (except for the Snipping Tool part, which only applies to Windows 7 and Vista).
- In this Windows 7 tutorial:
- Take a screenshot of the entire screen
- Take a screenshot of the current window
- Take screenshots of an area of the screen
Take a screenshot of the entire screen
If you want to show everything you currently on your screenshot, you will need to take a "full screen screenshot", which happens to be the easiest of all three variants:
- Position everything the way you want it to appear on the screenshot.
- Then, press the "Print Screen" key on your keyboard: it is typically near the top right corner, and is sometimes abbreviated to a cryptic "PrnScn", or something approaching.
- As soon as you release the Print Screen key, Windows 7 has copied whatever was currently visible on screen to your "clipboard" (a temporary piece of computer memory where Windows 7 stores anything you copy - be it text, photos, or an image of your screen!)
- Now that you have successfully taken a screenshot, you will need to store it somewhere - either email the screenshot, or save the screenshot on your computer (by using MS Paint, for example), etc.
This is all it takes to take a picture of your full screen in Windows 7!
Take a screenshot of the current window
In many cases, you will only need an image of the current program window:
- To take a screenshot of the current window only, all you need to do is hold the Alt key while taking a screenshot the "regular" way (taking a picture of the entire screen).
- So, press Alt + Print Screen, and Windows 7 will copy an image of the current program window (in the foreground) to your clipboard, ready to be pasted somewhere else.
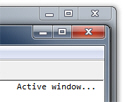
Tip: if you are not sure which is the current program window (the image of which window will be captured), look at the close button of the windows you are seeing. The one in the forefront (the "active window") will have a red close button in Windows 7 (unless you have changed the Windows theme you are using, in which this color may be different).
Take screenshots of an area of the screen
To capture a picture of a small, particular area of the screen, you'll need to use the "Snipping Tool":
- Open the start menu, type "snipping", and click on the "Snipping Tool" link as shown below:

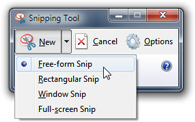
- When it opens, click on the "New" menu, and choose "Free-form Snip" from the submenu:

- Then, drag an outline around the area of the screen you want to capture in a screenshot; when you release the mouse button, Windows 7 will copy that image to your clipboard.
- You can then save the screenshot or email it (see links above), and even save your screenshot from the Snipping Tool itself. (Close it and click "Yes" to save the screen capture.)
Tip: if you need to capture an image of the cursor (mouse pointer) in your screenshot, you will need to use a third-party screen capture software - a later tutorial will make some recommendations for this particular case.
up ↑