Add / Get the Clock gadget for Windows 7 desktop + Customize settings
 The clock gadget comes with Windows 7, no need to download it. In this tutorial, we will explain how to add the clock gadget to your desktop, how to change the appearance of your calendar gadget, and how to customize its settings, including 8 different looks, the ability to show or hide the second hand, give a name to your clock, etc. You can even use a different time zone for your clock gadget than is currently showing on your computer - and you can add several clock gadgets to your desktop if you want to show multiple time zones at the same time!
- In this Windows 7 tutorial:
- Add the clock gadget to your desktop
- Customize your clock gadget settings
- Force the clock gadget to stay above other windows
- Make the clock gadget transparent, translucent, or opaque
- Remove the clock gadget from your desktop
- Delete / Uninstall the clock gadget from your computer
Get the clock gadget, and add it to your desktop in Windows 7
Follow these steps to add the clock gadget to your desktop:
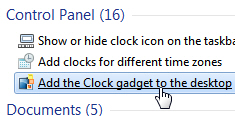
- Open the start menu, and type "clock" in the search field.
- Then, click on the "Add the Clock gadget to the desktop" link Windows 7 displays in the search results: (the clock gadget is a special gadget, and has its own "Add" entry inside the start menu).

- Windows 7 will open the Gadget Gallery application, whether the clock gadget was already added to your desktop or not: this is because you can add multiple clock gadgets to your desktop.
 You will see the clock as one of the first gadgets listed inside the Gadget Gallery: to add it to your desktop, start dragging it, and drop it anywhere on your desktop.
- Note that the clock currently has its default appearance: we will show you in a minute how to customize it, and use one of the 8 themes it includes.
- Once you have dropped the clock gadget, it floats on your desktop in the area where you released the mouse button (if you want, you can download the Windows 7 Sidebar).
- To reposition the clock gadget, just move it with your mouse!
Customize the clock gadget settings in Windows 7
Follow these steps to customize your clock gadget:
 Move your mouse pointer (cursor) above the clock: a close button ("x") will appear, as well as a gear button: click on the gear button to configure the available options.
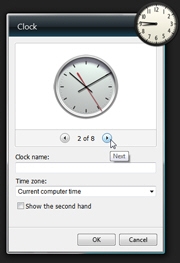
- Windows 7 will open the dialog that lets you change the appearance and behavior of the clock gadget, as shown on the screenshot below:

 Use the left and right arrow buttons to switch to a different clock;
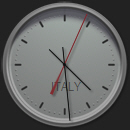
- You can give a name to your customized clock gadget by typing it under Name (useful to track time across different time zones!)
- You can configure your clock gadget to show a different time zone: the clock uses your "Current computer time" by default, but you can pick any time zone in the world from the dropdown menu.
- Also by default, Windows 7 doesn't show the seconds hand inside the clock gadget: to display the seconds on your clock, just check the "Show the second hand" checkbox.
- Once you have customized your clock gadget, click on the OK button to apply the changes, or Cancel to keep your current settings.
 Tip: even if you have chosen not to show the seconds, you can move your mouse above the clock gadget to show you the current time in "long time" format: you can make Windows 7 use military time instead of the AM/PM format, for example.
Force the clock gadget to stay above other windows ("Always on top")
 A couple of additional settings are available to the clock gadget and all other gadgets: right-click on the clock, and choose "Always on top", and Windows 7 will always leave the clock gadget floating above all other program windows you have open.
To disable this option, simply right-click again, and uncheck "Always on top" from the context menu. Then, and by default, you will have to minimize all your open program windows to see the desktop gadgets that are currently running.
Make the clock gadget transparent, translucent, or opaque
A final setting you can configure for the clock gadget and other Windows 7 gadgets is their Opacity. Right-click on the clock, and select opacity to pick a level or transparency: 20% (nearly completely transparent), 40%, 60%, 80%, and 100% (the default, completely opaque).
Below, the clock gadget barely translucent at 40% opacity:
Just move your mouse over the clock gadget, and it will appear fully opaque, regardless of the customized transparency level you may have chosen.
Remove the clock gadget from your desktop
Like all other Windows 7 gadgets, you can remove the clock from your desktop without uninstalling it: to hide the clock gadget from your desktop, just click on its close button ("x"), and it will be hidden.
Caution: when you close a desktop gadget, Windows 7 will keep it on your computer, but it will not save its settings. In the example above where you named your clock, showed or hid its second hand, and optionally changed its time zone, all these options would be lost.
Delete / Uninstall the clock gadget from your computer
To completely delete and uninstall the clock gadget from your Windows 7 PC, type "Gadget Gallery" inside the start menu's search field, and hit Enter to open it.
Once Windows 7 has opened the Gadget Gallery, right-click on the clock gadget, and choose "Uninstall" from the context menu. Since desktop gadgets take so little space, and our out of your way once you close them (to remove them from the desktop), we recommend that you don't uninstall the standard clock gadget. If you accidentally chose Uninstall, Windows will give you a last chance to change your mind before uninstalling the clock: "Do you want to uninstall Clock?" Click on the "Don't Uninstall" button to keep the clock gadget:
This is all it takes to get the clock gadget, add it to your Windows 7 desktop, customize its settings, remove it from your desktop, or uninstall it from your computer!
up ↑