Configure Recycle Bin settings on Windows 7 desktop
The Recycle Bin is your second-chance, temporary repository for deleted files in Windows 7: in practice, it behaves a bit like a special folder, but, as you'll learn in this tutorial, there are quite a few settings you can customize for the Recycle Bin that make it quite unique. A couple of earlier tutorials have touched on the subject, notably showing you how to change the Recycle Bin icon (you can customize both the empty Recycle Bin and full Recycle Bin icons!), and how to hide or show the Recycle Bin icon on your desktop (alongside other system icons). This tutorial will explain a few other settings, including how much space deleted files should take up at most, how to bypass the Recycle Bin, and how to suppress delete confirmation messages.
Customize Recycle Bin options
Let's start by looking at the Recycle Bin properties:
- Minimize all windows by pressing Windows Logo+D on your keyboard (you can restore them all back up by pressing that same keystroke!), or using Aero Peek and the mouse.
- Then, right-click on the Recycle Bin on your desktop, and choose "Properties" from the context menu:

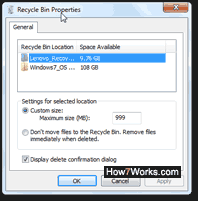
- The "Recycle Bin Properties" window will open, and start with a listing of all the "recycle bins" you have on your computer. While counter-intuitive, this just means that you may have hard drives or partitions (pieces of hard drive) dedicated to system restore, and other such things. In general, Windows 7 is installed on the "C:" drive, and this is where the Recycle Bin's content (deleted files and folders) are stored as well - select the drive in question under "Recycle Bin Location":

- With the "Custom size - Maximum size (MB)", Windows 7 allows you to change the amount of disk space the Recycle Bin will use at most; "MB" stands for "Megabytes" (and 1,000 megabytes equal 1 "gigabyte", FYI). In the screenshot above, the Recycle Bin is set to use at most 7 gigabytes of storage space; beyond that, older files will be permanently erased from your disk (and become unrecoverable, even with third-party file restoring tools). Optionally type in a new maximum Recycle Bin size in the text field.
Note: when you delete files and folders in Windows 7, they are not deleted by default - they are hidden except from within the Recycle Bin, but remain on the hard drive. This is why available space may not match with "not deleted" files! - The "Don't move files to the Recycle Bin. Remove files immediately when deleted" setting lets you bypass the right-click on the altogether. We don't recommend enabling this option for two reasons:
Warning: (1) if you tell Windows 7 to bypass the Recycle Bin, you will not be able to manually restore deleted files, and there are never any guarantees with undelete utilities; (2) you have access to this permanent deletion feature with a simple keyboard shortcut: instead of pressing Del (the "Delete" key) when files and folders are selected, press Shift+Del, and all files will be permanently deleted without going into the Recycle Bin. Never get into the habit of using this keystroke instead of the regular delete (we learned that the hard way!) - Further down, you'll see a "Display delete confirmation dialog" checkbox, which is checked by default. If you uncheck it, Windows 7 will automatically put files you delete into the Recycle Bin without preliminary warning - this applies to using the Del keyboard shortcut, right-clicking and choosing "Delete", choosing "Edit > Delete" menu, etc. We recommend keeping the default option, to avoid the puzzling problem of disappearing files, which will inevitably occur!
Click "OK" to apply your new settings (they take effect immediately).
up ↑