
Delete a cell from a table in Microsoft Word 2007
The previous tutorial explained how you can add new cells in the middle of tables in Microsoft Word 2007; this tutorial will show you how you can delete any cell inside a table, and what behaviors to expect as far as the remaining cells are covered. For the sake of clarity, this tutorial will show you how to delete the content of a cell, and next how to actually modify the table structure and delete a cell (as well as any content it has, whether text or picture).
Delete the content of a cell in a Word 2007 table
 To delete the content of a cell, position your mouse cursor next to the lower left corner of the cell whose content you want to remove: your pointer will take the shape show in the screenshot. At that point, click, and Word 2007 will select the entire content of the cell.
 Once the cell's background is entirely colored (by default, in blue, as shown on the screenshot), indicating a selection, hit the Del ("Delete") key on your keyboard.
Word 2007 will keep the cell intact in the table, but will have removed all its content.
Delete a cell (and its content) from a table
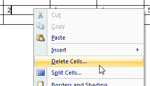 Right-click inside the cell you would like to delete, and Word 2007 will show a context menu: click on the Delete Cells menu item.
Word 2007 will open the Delete Cells dialog box, which gives you four choices: Shift cells left, Shift cells up, Delete entire row, and Delete entire column: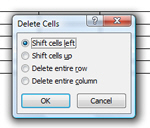
Delete cells option # 1: Shift cells left (default)
If you choose Shift cells left, Word 2007 will delete the cell and its content, and shift all cells that were on the right of the deleted cell, one slot to the left: in other words, you end up with a table containing one row whose last cell is missing (one cell removed, remaining cells shifted leftwards).
Delete cells option # 2: Shift cells up
 The screenshot on the left show the table before we apply the second cell-deletion option. If you select "Shift cells up" and click OK, Word 2007 will delete the content of the cell in which you right-clicked, and move the content of the cell right below it (if any) into its place. Microsoft Word will not remove a cell from the row below:
Delete cells option # 3: Delete entire row
By choosing Delete entire row, Word 2007 will delete the entire row containing the cell in which you right-clicked: this has the same effect as the Delete Row command we will discuss in a later tutorial.
Delete cells option # 4: Delete entire column
Like the previous option, "Delete entire column" will delete the cell in which you right-clicked, as well as all cells above and below it - in effect, deleting an entire column. This option too, has the same effect as another command covered in a later tutorial, the Delete Column command.
up ↑