
Insert a cell in a table with Microsoft Word 2007
Once you have created a table in Word 2007, you can easily customize the table by adding or removing cells, rows, and columns. This tutorial explains how to add a cell to a pre-existing Microsoft Word table. We will also let you anticipate Word's behavior when cells are added beyond the table boundaries, like adding a cell in a row who already has the maximum number of columns (or cells) in the table.
Add a table cell in Word 2007
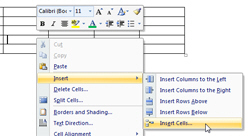 To add a cell in a table, right-click in one of the nearest cells in the table and choose Insert > Insert Cells.
Word 2007 will open the Insert Cells dialog, which lets you choose where the new cell should be created in the table, with four possible insertion options: Shift cells right, Shift cells down, Insert entire row, and Insert entire column.
We will explain each of these options: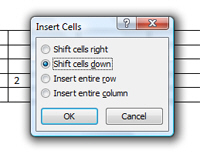
Insert cell option # 1: Shift cells right
If you choose Shift cells right and click OK, Word 2007 will create a new cell on the left of the cell in which you right-clicked (thus shifting other cells to the right).
In the screenshot above, we can see that Microsoft Word inserted a new cell (highlighted in blue) on the left of the cell (number 2) in which we right-clicked.
Insert cell option # 2: Shift cells down (default)
The default option is Shift cells down: this command instructs Word to insert a new cell above the cell in which we right-clicked, which has the effect of pushing down the cell into a new row of its own:
Insert cell option # 3: Insert entire row
If you choose Insert entire row, Microsoft Word will create a brand new table row above the row containing the cell in which you right-clicked:
Insert cell option # 4: Insert entire column
The final option Word 2007 gives you in inserting cells into a table is "Insert entire column" - this command will literally add a cell before the cell in which you right-clicked for every row, in effect creating a new column on the left of the cell and its up-and-down neighbors:
...And this covers the four ways in which Microsoft Word 2007 lets you insert individual cells in a table; as we saw, two of these cell insertion command actually correspond to adding an entire row or creating an entire column. The next tutorial will explain how to delete a cell in a Word 2007 table, and the behavior you expect from Microsoft Word in several cases.
up ↑