Resize a row in Microsoft Word (Table row height)
Any table you create in Microsoft Word documents will have a default width: each column will have a equivalent width, and each row will have the same height: but it is possible to resize a row, either individually, or for the entire table (these are the table's row height settings). In this tutorial, we will explain how to manually change an individual row's height in Word 2007, and how to change the row height settings for the entire table, so that newly inserted row will match the height you want.
Manually resize a table's row in Microsoft Word 2007
 To manually resize a single row in Word 2007, move your mouse cursor (pointer) towards the bottom border of the row in question: as soon as your cursor's shape changes to a double-headed resizing arrow (as shown on the screenshot), start dragging downwards, and Microsoft Word will increase the height of the row until you stop dragging its bottom border.
Word 2007 will display a dashed guide indicating the new bottom border (and height) of the row once you stop dragging and release your mouse button:
The table now shows one row with a height different from the other rows who still have their default height; if you plan on resizing more than one row, read on: the rest of this tutorial explains how to change the height for all the rows in the table, thus sparing you from having to manually resize all of them. We will go through the table's properties and settings.
Resizing all the rows in a table with Word 2007
If you want a different row height for all the rows in your table, including new rows you create later on, you need to go through the table's properties, and change the height you want for current and future rows; this will still leave you the option to manually resize rows as we showed above, but all current and future rows will have a height that fits your needs.
 Right-click on the table handle (top right corner), and choose "Table Properties". Word 2007 will open the Table Properties dialog, which contains several tabs: click on Row.
 Right-clicking on the table's handle has the double effect of selecting the entire table, and showing the context menu: if you resize your rows as shown below after right-clicking anywhere inside the table and choosing Table Properties, the row height settings you configure will only affect the row in which you right-clicked.
Tables' Row Size settings
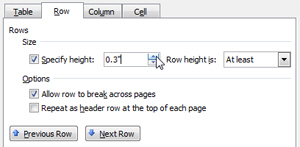
 The Row tab contains several settings: click on the Specify height checkbox to enable the row height settings.
Then, type or use the up and down arrows to set the desired row height: notice that the same line contains a dropdown menu that lets you determine whether the row height you just entered should be a minimum height or an exact height.
In most cases, you will want to choose "At least [height x]", in case one of your rows contains more data than can be shown by the row height setting.
Once you are done, click OK, and Microsoft Word 2007 will apply the new row height setting to all the rows in your table - and again, the row height setting will be inherited by rows inserted later on.
Manually give all rows the same height ("Distribute rows evenly")
 Yet another way to adjust the height of your rows in Word 2007 is to right-click on the table's handle (top left corner), and choose Distribute Rows Evenly from the context menu.
This command will maintain the table's current height, but will resize each row to give them an equal width. You can always resize the table and apply the Distribute Rows Evenly command once more, until all the rows in your table have the perfect height.