
Insert a row in a table with Microsoft Word 2007
A previous tutorial showed you how to create tables in Microsoft Word 2007; any table inserted in your document can be edited after the fact, and this tutorial will show you how to insert a new row inside a pre-existing table. While we saw that creating a new cell in a table can add a new row as a secondary effect, the dedicated Insert Row commands in Word 2007 give you more control and predictability over the insertion of new rows in tables.
Insert a row above the current row in Word 2007
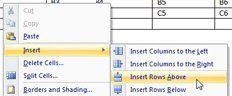 To insert a row above the current row in Word 2007, right-click inside any cell of the row, and choose Insert > Insert Rows Above. Despite the plural of the word row, Microsoft Word will only create a single new row above the row that contained the table cell in which you right-clicked.
Word 2007 will create a select a brand new row in your table:
You can then start inserting data in the cells of the new row, and keep on editing your table.
Insert a row below the current row in Word 2007
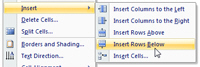 Inserting a new row below the current row in Word 2007 is just as easy: right-click in a cell containing the row below which you want to create a new row, and choose Insert > Insert Rows Below. Here too, even if Word says "rows", only a single row will be created below the current row:
...And this is how you create new rows in tables with Microsoft Word 2007; the next tutorial will show you how you can quickly delete a row (as well as deleting the content of that row) in Word 2007.
up ↑