Create / Add a custom screen resolution in Windows 7
Your computer comes with a "preset" of standard screen resolutions, which are affected by your video card (graphics card or GPU), and by your monitor hardware - either the screen attached to your laptop, or the monitor you connect to your PC. As you probably already know, you can easily change screen resolution in Windows 7, switching to one of these presets for your monitor. But what if you want to use a screen resolution that isn't available? Fortunately, as you'll learn in this tutorial, there are several options that allow you to add custom screen resolutions to your PC.
Create custom screen resolutions through your video card
Many modern and/or higher end graphics card allow the creation of your own screen resolutions:
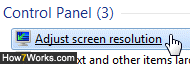
- First, open the start menu, and type "screen resolution" in the search field; then, click on the "Adjust screen resolution" link shown at the top:
- When Windows 7 launches the Control Panel, with the "Change the appearance of your display" page pre-selected, click on the "Advanced settings" link on the right: this opens the display properties dialog.
- The number of tabs you see in that dialog will depend on the software installed on your machine, and the hardware connected to it: but you will often see in the top right corner of the tab listing, one of them dedicated to your video card.
Tip: if you don't see it, try to check for Windows Updates, paying particular attention to the "Optional" updates, which typically will include firmware patches for your "peripherals" (hardware plugged into your computer, or part of its "inside"). Typical makers of GPU or graphics card, whose name would be mentioned in such optional Windows Updates, would be Intel, NDVIDIA, or ATI. Once you have patched your video card, restart Windows 7, and start over from the top of this tutorial! - Select the tab that pertains to your video card and/or monitor: (it will often include the logo of the graphics card or GPU manufacturer, as is the case in the screenshot below).
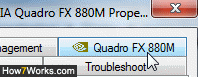
- When you select that tab, you will generally find a "Launch" or "Start Panel" button of some sort: click on it, and explore the options available for your particular video card. In the case of NVIDIA, for example, you get a "Manage custom resolutions" link that allows you to create your own screen resolution.
Tip - how to calculate your own custom screen resolution: to avoid ending up with a distorted image, you need to keep the right proportions for your viewable pixels horizontally and vertically. Find the screen resolution you like best, of the ones to which you already have access. Then, take note of the width and height in pixels. Finally, choose the width or height (in pixels) you'd like for your new resolution, and plug the numbers in our custom screen resolution calculator:
Using a third-party tool to add a custom screen resolution
If your advanced display settings don't include the ability to create custom screen resolutions, don't despair: there is a nifty third-party utility we've used several times in the past (with mixed results, see warning below), called "PowerStrip" - use at your own risks, we are not affiliated with this company, etc. While this tutorial won't go into details, consult the software website and documentation to add your own resolution to your monitor. It is both easier and safer to use a tool developed by Microsoft or the graphics card maker, but this piece of software comes in handy as a backup solution.
Caution: make sure that you know how to start Windows 7 in safe mode, especially if you are experimenting with a third party utility to customize your screen resolution settings. You may well find yourself starting with a blank screen, as happened to us several times with these custom utilities on Windows Vista / Windows XP.
up ↑