How to get to the Control Panel in Windows 7
The Control Panel gives you a centralized access to pretty much any settings you'd want to configure in Windows 7 - it was completely redesigned with Windows XP, and once more in Windows Vista. If you've used Vista, the Windows 7 Control Panel will look familiar and behave quite predictably. In fact, it is the most intuitive iteration yet, and even beginners will figure out how to use it in no time. This tutorial shows you how to get to the Control Panel, and how to access quickly all the options it contains with just a few clicks and/or keystrokes!
How to launch the Windows 7 Control Panel
The easiest way to open the Control Panel in Windows 7 is to use the start menu: click on the start button (Windows logo in the corner of the screen, generally the lower left corner unless you've moved the taskbar), and click on the "Control Panel" button as shown below:
Tip: if you cannot see that button on the right column of the start menu (it is there by default), learn how to show the Control Panel on the Windows 7 start menu.
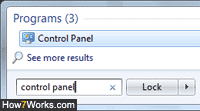
Another way to launch it from the start menu is to type "control panel" in the search field:
Directly access the correct options screen
Because the Windows 7 start menu allows you search everything on your computer, you can in most cases bypass opening the main Control Panel page, and directly go to the settings you are interested in. For example, type "change wallpaper" in the search field, and Windows will automatically find the best result: notice that it is listed under a section labeled "Control Panel" to indicate that all results below it will open some settings inside the Control Panel:
Efficiently using the new Control Panel
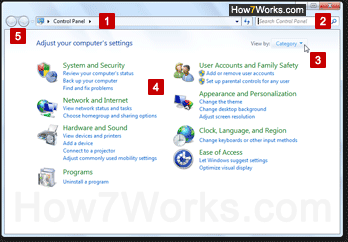
Regardless of how you get to the Control Panel, here are a few tips that will help you make the most of it, and quickly find any setting you want to customize - use the screenshot below for reference:
- Number "1" is the "address bar": as you navigate through the Control Panel, it will show you "breadcrumbs" of your location - click on any of them to move to another section; click on the arrow buttons that separate them, and you'll get a dropdown menu that allows you to access sub-pages of that particular category.
- Number "2" is the search field, which works just like the start menu's search field: simply type the option you want to configure, as you would word it yourself, and the Control Panel will in most cases find the exact settings you had in mind - note that the search happens in real time, as you type, which makes locating customization options even easier!
Tip: press Esc on your keyboard or click on the "x" button in the search field to clear your query and restore the original screen's content. - Number "3" is a dropdown menu on the "homepage" of the Control Panel, which lets you display your settings by "Category" (default, and easiest to use), "Large Icons", or "Small Icons".
- Number "4" covers the area where groups of settings are located: to show all settings for a particular category, click on the green link in larger letters; to access one of the most popular settings under that category, click on a blue link featured below the green category link.
- To make the Control Panel more user-friendly, it includes navigation buttons (number "5") that work just like a web browser (Internet Explorer, Firefox, etc.) Just click on the Back or Forward arrows to move to previous or next screens you visited, or click on the dropdown arrow to skip to a screen you visited!
Between the start menu and the introduction this tutorial gave you to the Control Panel, there are no settings you won't be able to access and customize in Windows 7!