Save a theme in Windows 7 (Custom Windows themes)
 As you saw in the previous tutorial, you can easily change theme in Windows 7: we also mentioned that themes are not just an appearance for windows, start menu, and taskbar; they also keep track of other settings you may have configured, like menu animations, font smoothing / anti-aliasing options, etc. Whenever you change theme, Windows 7 will retain these settings, but not as part of the previous theme you have: in order to associate all the settings like desktop wallpaper you changed, you will need to manually save the theme. Saving themes is both quick and easy to do, as you'll see. We will close this tutorial by also showing you how to rename a theme you saved, or how to create a copy of it by saving it under a different name.
- In this Windows 7 tutorial:
- Save your current theme as a custom theme
- Rename a saved theme / save themes under a different name
Save your current theme as a custom theme
Follow these steps to save your current appearance configuration as a custom theme:
- To access Windows themes, you can either type "themes" in the start menu's search field and click on the "Change the theme" link, or you can right-click on an empty area of your desktop, and choose "Personalize" from the context menu.
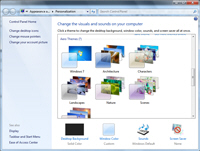
- In both cases, Windows 7 will open the Control Panel, with the "Change the visuals and sounds on your computer" screen automatically selected:

- All standard and custom themes are listed inside the same container - use the scrollbar on the side to see all of them.
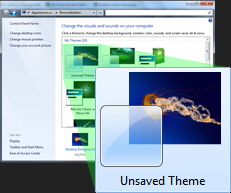
- Notice that, at the top, Windows 7 displays an "Unsaved Theme"; if doesn't, it simply means that you have not changed any of your appearance settings since you last changed theme: in that case, close this window and change your wallpaper (one of the option that will create an unsaved theme). And then come back to the Windows Themes screen in the Control Panel.
- Here's an example of an unsaved theme, as it will appear (at the top) in the Windows Themes listing:

- You can only save themes you see in the Control Panel, that are listed as "Unsaved". To save a theme, right-click on it, and choose "Save Theme" from the context menu (for the moment, ignore the "Save theme for sharing" menu item).
- Windows 7 will open a "Save Theme As" dialog: type a meaningful name under which to save the selected theme, and click on the "Save" button (or hit Enter on your keyboard).

- As soon as you do, Windows 7 will save the selected theme under the name you typed, and automatically move it to its correct position: all saved themes are listed at the top, under "My Themes", and are displayed in alphabetical order, based on name.
- That's all it takes to save a theme in Windows 7! You can now safely switch to another theme, without losing the customization you applied to the previous one; and change back to that theme with a click, whenever you want.
Rename a saved theme / save themes under a different name
But what if you want to rename a theme you saved, or save a copy of it under a different name? Windows 7 lets you do this quite easily (renaming a saved theme takes a couple of steps).
To save a copy of the selected theme under a different name, right-click on the theme in question, and choose "Save Theme": type a name for the custom theme, and hit Enter. You will now have two copies of the exact same theme, each saved under its own name.
To rename a theme you already saved under a certain name, just do the same as above, to end up with two saved copies of the same theme: then, right-click on the theme you saved under the wrong name, and choose "Delete Theme" from the context menu.
Note: you cannot delete the current theme, so -if needed- click on the theme you saved under a new name (Windows 7 will apply that theme), and then right-click on the theme saved under the old name and then choose "Delete Theme" to remove it.
up ↑