Map as drive a shared drive or folder on your local network in Windows 7
You can use the Windows 7 "Map Drive" feature (also available in earlier versions of the Windows operating system like Vista or XP) to make it faster and easier to access network drives and shared folders: in essence, Windows will treat these remote locations as though they were additional hard drives on your computer. This means that they will automatically show up in your drive listing, saving you the hassle of having to -every time- manually browse your network to access shared files.
Map as drive a shared folder, drive, or network computer on HomeGroup
Follow these steps to map as drive a network location:
- First, open Windows Explorer: either press the Windows logo+E keyboard shortcut, or right-click on the start button and choose "Open Windows Explorer".
- Then, navigate to the destination folder or drive on your local network: this should be the "final folder" in which you want to navigate.
Note: keep in mind that once you map it as a drive (which can be undone -or "unmapped"- later on), you will not be able to access the "parent folder" of the folder you are mapping as a drive - but you will still be able to manually access that folder's parent folder by browsing the network manually, instead of using the mapped drive.
- Once you are inside the destination network shared folder that you want to map as drive, right-click on any part of the network path inside Windows Explorer's address bar, and choose "Copy address as text" from the context menu, just like this:

- Then, press Alt+T to show the Tools menu, and click on "Map network drive":

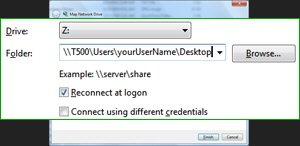
- Windows 7 will open the "Map Network Drive" wizard, and present you with three very simple options, which we explain in detail after the screenshot.

- The first choice you need to make is what to map the drive or shared folder as: just pick a letter from the Drive dropdown menu - don't worry, Windows 7 will only show you available letters, to avoid conflict with existing physical drives or mapped drive you have for your computer.
- In the Folder text field, just paste the network path you copied earlier on in Windows Explorer.
- The "Reconnect at logon" checkbox, if checked, instructs Windows 7 to automatically try to reconnect to the network resource (remote drive or shared folder on your local network or HomeGroup) make the mapped drive available to you right away. If it is unchecked, Windows 7 will start faster, since it doesn't have to check the network, etc. - but it will take a few seconds before the mapped drive becomes available the first time you need to access it.
- Finally, if you check the checkbox labeled "Connect using different credentials", Windows 7 will let you enter a different user name and password than the ones you used (explicitly or behind the scenes) when you accessed that network drive / shared folder earlier.
 Click on the "Finish" button to complete the drive mapping process!
- Windows 7 will confirm that the drive has been successfully mapped by opening it in Windows Explorer: now look at the address bar, and you will see that the letter you picked for the mapped drive is indicated between parenthesis, and that you can now just type the letter and a colon to launch this shared folder / network drive in Windows Explorer, as if it were a true external / hard drive on your PC.
