Share drives, folders and files on the local network in Windows 7
 One of the most practical use to having a wired or wireless network in your house or office (or HomeGroup) is the ability to share entire drives, folders, and files over the local network. This means that you no longer have to physically connect the computer to an external drive to backup files or copy them onto another computer. In this tutorial, we will explain how to share a drive, a folder, and all the files it contains.
Share an (external) drive / folder over the local network with Windows 7
In this portion of the tutorial, we'll show you how to share an external drive so that it is visible and accessible to all other computers on the network. But the process is exactly the same if you want to share a hard drive that is inside your computer, or to share a folder.
Follow these steps to share a drive or folder on the local network:
- Start by opening Windows Explorer; either right click on the start button and choose "Open Windows Explorer", or press the equivalent keyboard shortcut of Windows logo+E.
- windows explorer will open with My Computer selected automatically, showing all the drives that are currently visible to your Windows 7 PC.
- Find the drive you would like to share, or navigate to the folder you want to show on your network, then right click on it, and choose "Share with > Advanced sharing" from the context menu. (If this menu item is not visible, simply choose Properties, and then click on the Sharing tab.)

- Once you are in front of the Sharing tab of the selected drive, click on the Advanced Sharing button. (You may need to enter the Windows administrator's password in order to access this functionality.)

- Windows 7 will open the advanced sharing dialog; click on the "Share of this folder" checkbox to enable network sharing (Windows calls "folder" both folders you want to share and drives you want to share since, as far as Windows Explorer is concerned, both behave as folders, especially when accessed over your local network).
- Inside their "Share name" text field, type the name of the drive as you want it to appear to all users on your local network (so pick a meaningful shared drive name!)
- Now click on the Permissions button to determine who can access the shared a drive and what permissions they will have over the files they can see over the network.
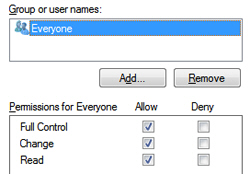
- When the Share Permissions dialog opens, click on the Add button.
- To share the drive or folder with everyone, simply type the word "everyone" and click on the Check Names button. Then click OK.
- To share the drive or folder with only selected users, just type the name of each individual user and click on the Check Names button to add them one at a time.
 Once you have finished adding all the users you want to be able to access the shared drive folder, it is time to setup file permissions to determine what users or allowed to do with the files inside that drive or folder.
- Select the group of users you want to configure, and then check each of the action they should be allowed to perform on these files: "Full Control" = they can do anything they want; "Change" = they can view and edit files; "Read" = they can only look at files, without making any changes.
- Then click OK to apply the change is and go back to the Sharing settings, and click OK once more to return to Windows 7.
- You have finished setting up file sharing for a drive or folder; it will now be visible over the local network to all users you have specified, under the name you typed under Share name.
Note: network users do not have to be using Windows 7, they can be on Windows Vista or Windows XP, even on a Mac if you have setup a Mac/Windows local network. The next tutorial explains how to edit the file permissions of shared files / folders.
Tip: you can tell right away if a drive is currently shared in Windows 7, because it will have a user group icon displayed on top of its own icon, circled inside the screenshot below:![]()