Move your mouse pointer (cursor) with the keyboard in Windows 7 ("MouseKeys")
If you find yourself without a mouse, Windows 7 includes a feature called "MouseKeys" which lets you use your keyboard instead of a mouse or pen-and-tablet combo. When MouseKeys is turned on, some of the keys on your keyboard become "directional arrows" that allow you to move around the cursor on your screen.
Enable (or disable) MouseKeys on your Windows 7 computer
Follow these steps to start using your keyboard as mouse:
- Open the start menu, type "MouseKeys" in the search field, and hit Enter.
- Windows 7 will open the "Make the keyboard easier to use" screen in the Control Panel's Ease of Access Center (which contains all the accessibility features available to Windows users).
- To enable MouseKeys, check the "Turn on Mouse Keys" checkbox under "Control the mouse with the keyboard". (If you later decide to disable MouseKeys, follow these exact same steps, but uncheck the "Turn on Mouse Keys" checkbox and then click OK to apply the change.)

- Then, click on the "Set up Mouse Keys" link to configure your keyboard to move the mouse pointer / cursor, and Windows 7 will load the MouseKeys configuration screen.
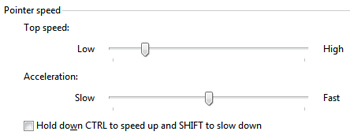
- Since most settings are self-explanatory, we won't spend any time on them; aside from giving you the ability to customize which keyboard shortcuts you can use to move the cursor on screen, notice that this option screen includes a "Pointer speed" section: it is perhaps the most important, since you will unlikely tweak it as you get more familiar with MouseKeys, by customizing the "Top Speed" of the cursor when it is controlled by the keyboard, and the "Acceleration" level:

- Also notice that Windows 7 also gives you a way to override the default speed and acceleration of your "keyboard cursor" by holding down the Control key (Ctrl) to make the cursor go faster (accelerate), or the Shift key to slow it down (decelerate).
This is all it takes to enable MouseKeys in Windows 7, and move your mouse with the keyboard!
up ↑