Use a custom cursor file (*.CUR or *.ANI) for pointer schemes / themes in Windows 7
 As explained in the previous tutorial, Windows 7 lets you customize and change your cursor scheme (mouse pointers) - but in addition to the 13 point schemes that comes with Windows 7 (and the ones you can download and install on your computer), you can also customize a pre-existing scheme to use some cursors of your choice instead of the ones that come by default with the selected theme or mouse pointer scheme.
Customize individual cursors in a mouse pointer scheme
Follow these steps to choose other cursor files for a mouse pointer scheme in Windows 7:
- First, click on the start menu.
- Type "mouse pointer" in the search field, and click on the "Change how the pointer looks" result link to open Windows 7's "Mouse Properties" dialog.

- The "Pointers" tab should be automatically selected (otherwise, click on it).
- Windows 7 gives you at the bottom a preview of all the cursors that constitute the currently selected mouse pointer scheme; before we show you how to use your own cursor files (or other Windows cursors) for the current scheme, let's save it - this ensures that we are making changes to a copy of the mouse pointer scheme, not to the original one.
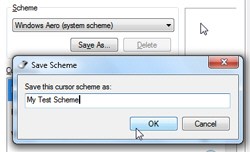
- Click on the "Save As" button, and type a custom scheme name inside the Save Scheme dialog box that opened, and then click OK to accept the new name.

- Windows 7 will create a copy of the scheme, use the name you chose, and select it automatically.
- Now, go through the list of mouse pointers in the preview, that are sorted by "situation" - each even type has a cursor associated with it; to change any of them, either double-click on the pointer name, or select it and then click on the Browse button: either way, a new dialog window will open, and let you choose another cursor file.
- The folder that opens is, by default, the Windows 7 cursor folder, but you can navigate to any other folder where you may have saved your own cursor files.
Note: Standard cursor files end with the ".CUR" file extension; files you find in the Cursors folder, which end with an ".ANI" extension are actually "animated cursor files" - just like the default Windows 7 waiting pointer (the spinning orb), these have some kind of looped animation built into the cursor - avoid using animated pointers if you are using a netbook or underpowered computer (these consume more resources than the standard, non-animated / static cursors).
- Once you have found another cursor for the selected event type in your scheme, double-click on it to select it and return to the Mouse Properties dialog.
- Repeat the same operation until you have configured all the custom pointers you wanted.
- To preview the new pointer scheme in Windows 7, just click on the Apply button to try it out.
- And click OK to apply the modified scheme, and start using these pointers right away.
Remember that you have customized your own, saved mouse pointer scheme: you can go back and choose one of the original Windows 7 cursor themes, which were left untouched.
up ↑