Save a cursor scheme (custom mouse pointers theme) in Windows 7
As we explained in a previous tutorial, you can change cursor scheme in Windows 7, and even customize your theme based on one of the standard schemes that ship with Windows. But what if you want to save this cursor scheme, backup your current schemes, or export a particular mouse pointer theme and use it on another computer? Windows 7 lets you easily save and backup your cursor schemes, and we'll explain how to transfer them to a new PC or laptop.
Save the current cursor scheme in Windows 7
Follow these steps to save a mouse pointer theme under a file name of you choice:
- Open the start menu, and type "change mouse pointer" in the search field.
- Once Windows 7 loads the matching results, click on "Change how the mouse pointer looks":

- Windows will open the Mouse Properties dialog; make sure that the "Pointers" tab is selected.
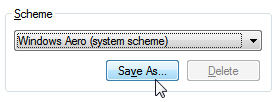
- The "Scheme" dropdown menu shows which mouse pointer and cursor theme you are currently using.
- Click on the "Save As" button to save or export you current mouse pointer scheme:

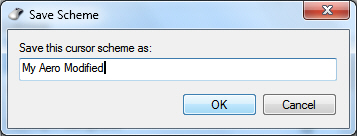
- As soon as you do, Windows 7 will open the "Save Scheme" dialog; enter a name inside the "Save this cursor scheme as" text field, and click on the OK button to create a file containing this mouse pointer theme on your computer.

- You have now created your own cursor scheme, and Windows has saved it to the "Registry", where it keeps information about your profile customization, including custom mouse pointer themes you have saved. From now on, you can switch to another cursor scheme without risk of loosing your custom themes; just use the "Scheme" dropdown menu to change back to one of your own schemes.
This is how you save your own mouse pointer schemes in Windows 7: in the next tutorial, you will learn how to backup or export your custom mouse pointer schemes.
up ↑