Show and restore hidden Windows Updates in Windows 7
The previous tutorial explained how to disable and hide a particular Windows Update; this process can only be done manually, and applies to either "important updates" (formerly known as "critical updates"), or "optional updates" Windows 7 will suggest, like additional software from Microsoft (Windows Live Essentials) or third-party vendors, like drivers for your processor, video card, etc. This tutorial shows you how to restore and show updates you chose to hide earlier on. To repeat something we said then: unless you have a very good reason to do so, you should never hide patches and upgrades to your machine that Windows Update deemed "important" - these typically affect both stability of the operating system and its security (vital to keep up-to-date if your PC connects to the internet).
Unhide an update in Windows 7
If needed, start by launch Windows Updates in the Control Panel: click on the start menu, type "update" in the search field, and select "Windows Update" in the results.
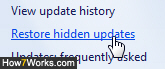
- Now that you are looking at the correct screen, notice the list of links on the left side of that window: click on "Restore hidden updates".
- You will now see a listing of Windows updates you elected to hide since you (or another user) first ran that copy of the operating system. Unlike the other updates listing, you cannot sort this one by date - but will typically have few enough hidden updates anyway.
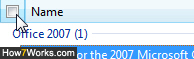
- Check the checkbox next to each update you want to restore - or check the very top checkbox to select all updates at the same time:
- Tip: if you do not see a particular update you know you previously hid, click on the "View update history" link on the left hand side to go through updates that were installed on your computer - and click on "Date Installed" to sort chronologically.
- Once done selecting, click on the "Restore" button: notice that it includes a shield icon; this is because like many administrative tasks, restoring hidden updates requires "elevated privileges". Type the administrator's password or click "Yes" if you receive that UAC prompt.
And you are done! Remember that you only un-hid these patches: you will now need to install them. Depending on your current settings, "important" updates should automatically be downloaded and installed. Optional ones will need to be manually selected (click on the "X optional updates are available" link, check the ones you want, and click "OK").
Note: if, after restoring a particular update, Windows Updates doesn't show it alongside the current important or optional updates, it simply means that since you hid that item, a newer patch addressed that functionality or security hole, and that your computer no longer needs that item. Likewise, if you no longer use a piece of hardware for which that patch was relevant, Windows 7 may no longer display it after you choose to restore it.
up ↑