Uninstall Internet Explorer 9 from Windows 7 / Vista
In an unusual push, Microsoft has decided to automatically add Internet Explorer 9, the latest version of its web browser, as a "critical" (read "non optional") upgrade pushed through Windows Update. If you have configured Windows 7 to automatically download and install updates on your computer, you will one morning wake up and see that Internet Explorer looks quite different from the day before! It is generally a good idea to use the latest version of software designed to work online, since that version is typically the safest. Nonetheless, this tutorial will show you how to uninstall Internet Explorer 9 from Windows 7 or Windows Vista - as soon as you do, you will notice that it will become available in Windows Updates, giving you the chance to upgrade to it when you feel comfortable doing so.
Remove IE9 from your PC
A previous tutorial showed you how to uninstall Internet Explorer 8 from your computer; in the case of Internet Explorer 9, the process is quite different, since it was installed by Microsoft as an "update" to your machine. Proceed as follows: (you may need to supply the administrator's password)
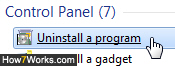
- First, close all Internet Explorer windows/tabs you have opened; then, type "uninstall" in the start menu's search field; click on the "Uninstall a program" result listed under Control Panel:
- When Windows 7 opens a listing of applications currently installed on your computer, click instead on the "View installed updates" link shown in the left side of that particular page.
- You will now be looking at a listing of the latest patches that were applied to your PC; instead of trying to locate IE9 in the group, just type "Internet Explorer" in the search field (located in the top right corner of the Control Panel window) to filter these results; then, right-click on "Windows Internet Explorer 9" and choose "Uninstall":

- When Windows 7 displays a "Are you sure you want to uninstall this update?" confirmation dialog, click on "Yes". Depending on your current credentials and security settings (whether or not you are logged in as a standard user or administrator, for example), you may need to supply a password or click on "Yes" when the User Account Control dialog ("UAC Prompt") appears.
Windows will now take a few minutes to remove Internet Explorer 9; once you restart your computer when prompted to do so, you will be back to using the previous version of IE that was on your machine; in the case of Windows 7, this can only be Internet Explorer 8; in the case of Windows Vista, it could be either IE8 or IE7 (which comes pre-installed on Vista).
Note: as mentioned earlier, you can at any point re-install Internet Explorer 9 on your PC. To do so: type "Windows Update" in the start menu; click on the "Optional Updates" link; and finally, check the relevant "Internet Explorer" checkbox on the next screen; click "OK" and install!
up ↑