Create and add a folder in the start menu in Windows 7
By default, the Windows 7 start menu comes with a few default programs listed in it, and a special folder visible at the bottom, called "All Programs". This folder contains a reference (or shortcuts) to the applications that came installed on your computer, as well as programs you have installed yourself. But what if you want to create your own folders inside the start menu, and organize shortcuts your own way? Fortunately, Windows 7 lets you make your own folders right inside the start menu, as we'll explain in this tutorial, and as did previous versions of Windows.
Add a folder to your start menu in Windows 7
Follow these steps to create a custom folder (or subfolder) under the All Programs folder:
- Click on the start button to open the start menu.
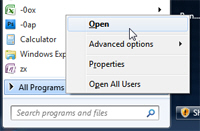
- Then, right-click on the "All Programs" folder at the bottom, as shown on the screenshot below:

- Next, Windows 7 will open this folder inside Windows Explorer, for your profile: this means that anything you will find inside that folder and its subfolder are files, folders, and shortcuts that are your own - in other words, they are visible under your Windows profile, and not necessarily under the account profiles of other users on the same computer.
Note: if you ever installed a program on Windows 7, you may remember having seen an option in the installer that allows you to "Install for all users" - if selected, this setting makes the application shortcuts appear not just in the start menu of the person who installs this software, but also inside the start menu of all other users on that PC. This is why a copy of the same files and folders may appear the profile of different Windows users. The programs that come with Windows 7 have their shortcuts visible inside everyone's start menu. - Now that you have opened the "All Programs" folder inside Windows Explorer, you can work inside it as you would with any other, regular folder. So, to create a folder that will be visible under All Programs, double-click on the folder labeled "Programs": its content (shortcuts and subfolders) are what appears in the start menu once you click on "All Programs".
- To create a new folder inside your start menu (not affecting other Windows users on your computer), just click on the "New Folder" button, as shown below:

- Then, type a name for your new folder, and hit Enter to accept it. The folder is now created; double-click on it to open it and place shortcuts or files of your choices inside it (and you can even create subfolders for that new start menu folder).
- Once you are done, click on the start menu and choose "All Programs": you will see the folder you just added, and a click on it will expand it to reveal its content, namely the shortcuts and files you placed inside it a minute ago.
This is all it takes to make a new folder and place it inside the Windows 7 start menu.
Note: you have just added a folder in the start menu under your own profile, which means that it will not be visible to any other user on your computer; if you need to create a folder visible to all users, read the next tutorial to see how to open the start menu for all users in Windows 7.
up ↑