Hide or show drives and folders in Explorer for Windows 7 (Navigation Pane)
 When you open a folder or zip file in Windows Explorer, Windows 7 will by default display a "Navigation Pane" on the left side of the window: this navigation pane will show your "Favorites" (and you can add favorite folders in Windows Explorer), your "Libraries" (Documents, Music, Pictures, and Videos), your "Homegroup", your "Computer" with internal and external drives, and your local "Network", as applicable. The screenshot on the left shows the Windows Explorer Navigation Pane highlighted in green; in this tutorial, we will show you how to show or hide these drives and folders on the left of Explorer, and restore them later on.
Customize the Explorer Navigation Pane to visible or hidden
Since Windows Explorer displays the Navigation Pane by default, we'll assume that you are trying to hide it; the steps are the same to show it back on the side of the window:
- First, open Windows Explorer; Windows 7 lets you do that either by double-clicking on a folder on your desktop, by pressing the WindowsKey+E keyboard shortcut, or by right-clicking on the Start button and choosing "Open Windows Explorer" from the context menu.
- Once you are inside Windows Explorer, click on the Organize button in the toolbar, and click on the "Layout" submenu; then, choose "Navigation Pane".
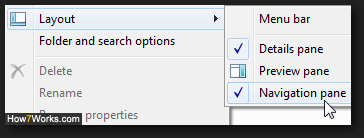 Tip: if a checkmark is currently displayed next to the word "Navigation Pane" in the menu, it is set to be visible; otherwise, it is set to be hidden. If you see a checkmark without seeing the navigation pane, make sure that your Explorer window is not extending out of the left side of the screen.
 - Note that the Navigation Pane visibility doesn't affect any of the drives and folders it normally displays, since these are just "shortcuts" to these particular locations. You can still access these drives and folders the usual way, albeit with a few more clicks!
A compromise: resize the Navigation Pane in Windows Explorer
Since showing or hiding the Navigation Pane is a three-click, slightly tedious process, here's a tip that may allow you to achieve the desired effect without necessarily changing the visibility of that pane:
When Windows 7 shows the Navigation Pane on the left side of a Windows Explorer window, move your mouse pointer above the border that separates the left pane from the content of the selected folder; notice that the cursor now becomes a horizontal resizer:
Just drag and hold to the left to make the Navigation Pane narrower, or to the right to make it wider. As an indication, here is the narrowest Navigation Pane Windows Explorer allows you to have: (and you can make it as wide as ~80% of the Windows Explorer window's width.)