How much free space is left on my hard drive? (Disk Usage)
Depending on your computer's hard drive space (total storage) and how you use your PC, it can be important to stay on top of your disk usage. Multimedia files (like iTunes TV shows and movies) take disk space in big chunks of 500 Mb (megabytes) to 1 Gb (gigabyte). In this tutorial, we will show you a quick way to determine the amount of free space you have on your hard drive; this also applies to any external storage device like USB drives (flash drives) or regular external hard drives you use for backup and additional storage.
- In this Windows 7 tutorial:
- Check the remaining storage space of a drive
- Configure Windows Explorer to always show disk usage for all drives
Check the remaining storage space of a drive
Follow these simple steps to check "used space" and "free space" on a drive:
- First, open Windows Explorer: right-click on the Start button and choose "Open Windows Explorer", or a this keyboard shortcut: hold down the Windows logo key, and press "E" (as in Explorer).
- Windows 7 will open Windows Explorer at the "Computer" location, which provides a full listing of hard drives and currently plugged in external drives.
- Right-click on the drive whose storage space left you want to check, and choose "Properties"
- The drive's Properties window opens
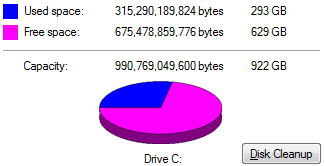
- On the General tab (selected by default), Windows 7 displays the amount of space left under "Free space", and the portion of disk space you have used so far:

- Ignore the numbers expressed in bytes, look at the gigabytes measurements instead (easier to read). Windows 7 also gives you a chart pie representing total amount of space ("Capacity"), and the amount of space you have currently used.
 If you change the icon view to Tiles, Windows will automatically show you this information, with a breakdown by "hard disk drives" and "devices with removable storage". The next section of this tutorial explains how to customize the columns in Windows Explorer to always show disk space used and free space - this spares you from having to follow the steps above.
 Tip: to change view in Windows Explorer, simply click on the "Change your view" button a few times; you can also click on the dropdown arrow and directly pick "Tiles" as icon view.
Configure Windows Explorer to always show disk usage for all drives
Telling Windows 7 to show used space and free storage left automatically is simple:
- Go to Windows Explorer at the "Computer" location, where all your drives are showing.
- Click on the "Change your view" button's dropdown, and choose "Details"
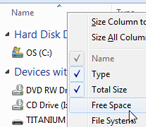
 Then, right-click on any of the column headers, as shown on the screenshot, to choose additional columns of information to display about your drives (both computer hard drive(s) and external storage devices).
- Then, click on any field you want to see about your drives, and repeat the operation: relevant pieces of information you can show in Windows Explorer include "Type", "Total Size" (total capacity of the drive), "Free Space" (storage left), "File System" (
FAT32orNTFS), "Comments", "Network Location", and "Percent Full" (a mini progress bar illustrating current disk usage - see the screenshot below). - Here is an example of showing some of this disk space information in Windows 7:

- You can now close Windows Explorer; next time you open it, Windows 7 will remember the last setting, and show the icon view you last selected, along with each column you chose to display.