How to drag to create a shortcut to a folder or file in Windows 7
As many already know, you can create a shortcut to a file or folder by right-click on the item in question, and choosing "Create shortcut" from the context menu. But there is an even easier way, which also makes it more simple to create a series of shortcuts for multiple files and folders selected at the same time. This technique works with mouse shortcuts in much the same way as the previous tutorial explained how to quickly copy multiple files and folders at the same time in Windows 7 (without having to go through the Windows clipboard). While the current tutorial focuses on Windows 7, the exact same trick works in Windows Vista, Windows XP, and earlier versions of Microsoft's OS.
Make shortcuts to one or more files and folders
Follow these steps to drag to create shortcuts in Windows 7:
- First, navigate to the folder that contains the file of folder of which you need a shortcut; if these files are on your desktop, just minimize all program windows to see the desktop - otherwise, navigate to that folder inside Windows Explorer.
- Once inside the folder in question, select all the files you want to shortcut: for a single shortcut, just give a regular left click on the file; to create several shortcuts at the same time, select each file or folder, one after the other (see how you can select multiple files or folders at once).
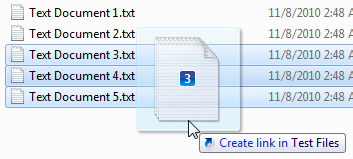
- When all the files are selected, press the Alt key on your keyboard, and keep it held down. Then, start dragging the files you selected, and Windows 7 will display a tooltip that reads "Create link in {folder name}", as shown on the screenshot below: ("link" is the same as "shortcut", or "alias", for Mac users out there)
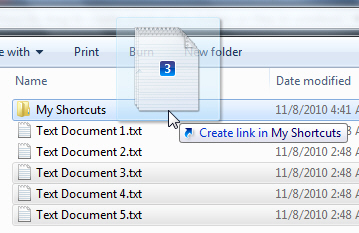
- If you drop the files inside the same folder, the shortcuts will be created in that very folder, from where you can move them wherever else you want them. In the following screenshot, we have created a folder to store our shortcuts, and Windows 7 displays an updated tooltip to indicate that when we release the mouse button, the file and folder shortcuts will be placed inside that subfolder:
- Once you have released the mouse button, Windows 7 will make all the shortcuts you specified: now you can release the Alt key on your keyboard (if you released the Alt key to early, Windows would have either moved or copied these files and folders).
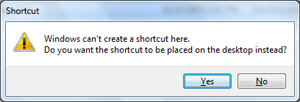
Tip: by default, some system folders (like "Program Files", or "Program Files (x86)" for 64-bit Windows) will create the shortcuts not inside the current folder or subfolder, but on your desktop. Just click on the "Yes" button, and then move the shortcuts that were created to the destination folder in which you wanted them in the first place: